Entri Populer

Labels

Wednesday, March 31, 2010

Wedding Inspiration {Pink & Yellow}

We looked at pink and yellow interiors yesterday, and today, we're looking at this cheerful and feminine palette translated into an oh-so-perfect for spring wedding (while welcoming back the long absent inspiration board!)


CHAPTER EIGHT– CLOUDS

What could be more beautiful than the elegance of delicate clouds decorating the soaring blue sky? However, too often clouds become a muddy mess or heavy, leaden blobs. Here are a few suggestions to help you find the structure of clouds and keep them light and airy, clean and bright.

CLOUD BOX
Many people look at clouds and become baffled at the complexity they see there. Think of a cloud as a box, having a top, bottom, and sides. I know this seems far-fetched, since a box appears to contrast sharply with the loose, unstructured nature of most clouds, but if you will begin with the idea that clouds have a structure such as a box it will go a long way in helping you configure clouds properly in many instances. This simple look at the underlying structure should begin to help you see that even the wispiest cloud has three-dimensional form.

Coronado Sky, 9x12"

Think of a glass plate the size of the sky, stretching overhead to the horizon. Mentally place your cloud boxes on this sheet of glass, looking upward through the glass plate. Think about how the clouds grow smaller near the horizon, overlapped by the larger, nearer clouds that float higher in the sky overhead. You see far more of the bottoms of the nearby, overhead clouds than you do of the clouds farther away that are much lower in the sky. Thus, painting the shadowed bottoms of clouds will identify their height in the sky.

COMPOSING
Have you ever noticed that clouds are never still? If not, try painting on location and you’ll soon observe their ever-changing habit. The wind blows persistently from one direction. You’ll get far more believable results when you compose clouds with this motion in mind. If you’re painting from a photograph, identify the “point of wind”, the direction from which the wind is coming. You’ll often have visual clues such as crested cloud tops, ragged flags of clouds trailing behind or swelling cloud tops showing strong updrafts. Keep this directional thrust in mind as you do a completed underdrawing of the clouds.

Because so often clouds seem amorphous and vague an underdrawing to plan shapes, planes and values is very important. Many times students become baffled at the complexity and seeming indistinction of clouds and fail to plan these elements. You simply cannot abandon the clouds to a formless set of loosely sketched lines. Instead spend time analyzing where the clouds are blowing, how they overlap, and what tones best will describe what you see.
Scent of Rain, 18x24"

VALUE
Clouds are among the lightest values in the landscape. They’re light in color and they float in the lightest plane of the painting, the sky. Remember that even the dark bases of the clouds in shadow are among the lighter values in the painting. Dark clouds are never darker than the earth values because they block the light, casting shadows that cause the earth to be darker. An overly dark cloud becomes the proverbial “lead balloon”! Think of it this way: clouds are made of water droplets and ice, through which light filters to one degree or another. No self-respecting cloud could possibly be as dark as the shadowed rock of a mountain. So keep the clouds light, even in the darkest of instances.

Don’t trust photographs for evidence of this. Often a photo will give the illusion that dark storm clouds are as dark or darker than the land plane, but further examination usually proves that it’s the fault of the camera’s habit of averaging the light. Your own observations will be far more accurate and valuable, so the next time a cloudy sky threatens, spend some time outdoors analyzing the values you see. Squint one eye and close the other and ask yourself where the darkest dark resides, and just see if it isn’t in the land plane. Remember, too, that we are not in the business of painting the exceptions we see, but applying those generalities we observe regularly.

Clouds have a special glow to them because they hold light inside. The water or ice they’re composed of tends to bounce radiance around inside, creating a delightful scattering of light. Carefully retain the light in the center of the cloud to create this special glow, rather than giving clouds only a stark white edge. This silver lining effect is only found when the cloud is directly intervening between your eye and the sun. Instead, pull light from the center of the cloud outward to the edges, while using light and shaded areas to describe thicker or thinner areas, to some degree or another.

The edge of a cloud in a clear blue sky can be etched with brilliant clarity or can be slightly grayed where cloud banks overlap. Small cloud fragments, broken off from a cloud mass and silhouetted against the sky, are often slightly darker in value and cooler in color because the sky shows through them.

Twenty minute cloud studies done on various colors, Canson paper

COLORS
What color is a cloud? White is a childishly simple description, since clouds are virtually all colors. Generally, a cloud is warm on top, because of the warm color of the sun, and cool on the bottom, which is in shadow. Don’t limit yourself to white, gray and blue, but paint clouds using a wide palette of light and medium-light colors. They will look far more realistic than mere gray accomplishes.

Remember that the Law of Diminishing Intensity (per Carlson) states that the atmosphere cools and lightens all colors but slightly darkens and dulls whites and near-whites. Clouds, which are rarely ever pure white, appear rosy-white or yellowish-white on the horizon, perhaps due in part to pollution. Paintings from the 1800s and earlier show little evidence of such yellowing, appearing to be more pale, pale rose. Clouds at the zenith of the sky can contain brilliant white, especially in contrast to the deep blue of the sky.

SIMPLE MISTAKE
Why do most beginner’s paint clouds too chalky-white? The answer lies in a simple mistake that we make when we tilt our heads upwards to look at the sky overhead. As we look straight up we see the very darkest and most brilliant blue of the sky, and the very whitest clouds. We might assume that this high contrast of deep blue and blinding white is the norm and paint clouds and sky that way, as children often do. But how often do we paint the sky directly overhead? Instead, to determine the value of your clouds, look off toward the horizon. Compare the value of the sky and clouds, noticing that as the sky lightens on its journey toward the horizon the clouds progressively darken, dulling slightly, until the values nearly need. This beginning one-third arc of the sky, after all, is most often the part we include in our paintings, not the sky immediately above us.


GRAY CLOUDS
What is it about gray skies that can make the landscape so intensely beautiful? I was recently driving along a highway on a cloudy morning when I saw the light on some nearby trees. The colors of the highway itself, along with the glowing trunks and foliage, were breathtakingly intense. I thought it odd that an everyday piece of pavement, the ordinary tree trunks and usual green foliage looked so powerful. Then I realized that part of the reason was the dominant neutral of the gray behind it all. The clouds had added moisture to the atmosphere, which also seemed to intensify the colors, making them seem somewhat more saturated, but it was that gorgeous gray that really caught my eye.

Gray is one of those mysterious, almost unexplainable colors. Most pastelists tend to grab for the color on their wide-ranging palette that they need, and we certainly have grays. Pastel sets usually come with a standard warm and cool gray, but these ‘out of the tube’ colors seem static. There are occasional grays made by various manufacturers that are interesting, but I’ve found that making my own grays provides ones that are far livelier. This requires a little more advance planning, but it’s worth the time and effort to achieve a glowing gray.

Technically gray is arrived at by mixing two complementary colors. You’ll often hear about graying a color by layering the opposite color of the same value on top, which is an effective tool. However, this graying affect of one color laid atop another is different than mixing up colors to arrive at a gray. When I lay down only two colors and try to mix a gray—colors that are opposite on the color wheel—they usually become rather drab and boring, if they end up gray at all. It takes a trained eye and a very even hand to find and use the exact opposite colors, as well as the exact same value, and exactly equal amounts of each color. This combination becomes more a dulled color than a true gray, so I’ve derived a means of creating a mixture of colors that makes a lot more interesting grays.

Let’s say you want to paint the deep, intense gray clouds I saw behind the grove of trees. You have to start somewhere and I’ve discovered that often this need to choose one color to begin with can be confounding. You simply have to ask yourself if you had to choose one color, a color that you’d find on a simple primary-secondary color wheel, what would you choose? Ask yourself if it is warm or cool, which helps you get closer to the area on the color wheel. If warm, is it more orange, red, or yellow? If cool, is it more purple, blue or green? This will be your target color.

Next you want to identify the value of your gray. How dark or light is it? You have to identify the value in relationship to all the other values around it, of course, which is why doing a charcoal underdrawing will help you. Once you have completed your value drawing you can simply hold a value finder card over the area of the gray to identify how dark it is. Then you can find your target color in the correct value. Did you decide on purple? Make some marks a piece of paper until you find a purple of that value. If it’s blue or red or green or yellow or any color doesn’t matter. Find the right value.

Once you have your target color in the proper value, you need to find two other colors of the same, or very close to the same, value. I suggest you will find layering three colors to be far more effective than using only two. You usually need to establish enough depth in the pastel on your paper to make it paintlike, which requires at least three passes with your colors, perhaps more. To that end, using your target color, locate the triad of colors on the color wheel. This means that if you have, say, a purple of the right value, you want to find an orange and a green in the same value (secondary triad). These three colors make a triangle on the color wheel. Maybe you used a red as your target color. If so, your triad, or triangle of colors, will be red, blue and yellow (primary triad). What matters is that the values remain very closely the same. One problem is that yellow just doesn’t darken very well, and the nature of cloudy skies is that they tend to be darker in value. Dark yellow tends to go towards a very ugly greenish-yellow hue, or into browns that become reddish, which makes the resulting gray rather sickly looking. As a result, I tend far more often to use the secondary triad of orange, purple and green to make animated and appealing grays.

Don’t necessarily start with your target color, but head that direction by layering the other colors in place first. For instance, place the orange and green and then the purple, heading gently toward your target color. You’ll most likely have to mix these colors using multiple layers, allowing the sticks to become almost like a stiff brush as the edge begins to blend colors into one grayish purple. You’ll find with practice that the final color layered in place, in this case the purple, is the one that determines the flavor of what you see. You can do this mixture with any color, of course, not just the primary and secondary colors, and with some practice you’ll begin to have a sense of which three colors will make the gray you’re heading for. You can also do this in any value you need, whether light pale gray, medium gray, dark moody gray or any value in between.

Why does the secondary triad work so well? I think it’s because the three colors you use end up combining all the colors from the primaries and secondaries. You end up using an entire rainbow of color, all in the same value, making your grays dynamic. Instead of flat, boring out-of-the-tube neutrals you have every color dancing together in a neutral, which in turn allows any other color used nearby to harmonize with the lively gray. This is a good part of the reason why the grimy pavement of the highway, the ordinary trunks and the plain foliage all looked quite stunning, I believe. No matter what color they were the gray contained it, allowing a marriage that highlighted each color.


PAINT A BLENDED SKY
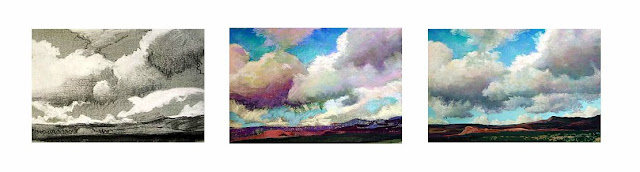
To paint a vital and attractive sky, try finger-blending your pastels to soften colors and edges, yet keep the clouds clean and bold. While blending pastels has a reputation for making muddy colors, you can layer and blend several times and then recover the sparkling quality of pastels. This technique works well on fine, deep-grained sanded surfaces or soft, absorptive paper. Some of the deeper sandpapers can abrade fingertips, although when used carefully they render beautiful results.


Since the sky is generally the lightest value in a landscape, keep your paper tone light or medium. This will help you structure your values correctly and will keep the colors glowing. If your tone is dark you have to work too hard to blend over it, which wastes precious pastels.

Start with an underdrawing in extra soft thin vine charcoal, adding mediums and highlights with a pastel pencil. It’s fine to compose from a photograph, but don’t try to recreate it. Carefully sketch in all of the values and details as you correct compositional problems and make decisions about contrast and values. This drawing will lie beneath your painting and will be blended into your colors, so be sure that you’re happy with it before going on to the next step.

Begin your painting with the very darkest colors, which may only be medium-light in value because the tone of the sky is so light. Don’t blend yet. Lightly lay in the medium and then the light colors. Within any one area be sure to put down two or three colors of the same or similar values to keep colors lively. Remember that colors of like values will seem to melt together, lying in the same plane of the picture. When you reach the light colors, don’t use white to begin. Save the lightest lights, whether white or any other color, for the very last touches on the painting, several layers later.

To create lively and beautiful grays use complementary or tertiary colors over one another. A light layer of lavender, peach and green, in any order, will result in a subtle hue if the colors you select are close in value, as will using yellow, pink and blue. Layering green over pink, blue over orange or lavender over yellow can make lovely grayed colors. Rather than reaching for the gray pastels in your palette, begin with these color suggestions and once you’re happy with the grays you’ve mixed, layer the box grays over the top only if needed. Make two or three passes so that you have at least three layers of color all over the paper. Keep these layers loose, but be sure that you have enough pigment covering the paper to blend without revealing too much of the ground. Don’t add any details.

Now comes the magic: With your fingers or the heel of your hand, lightly blend all the pastel together. Be loose and free, moving your whole arm. If you’ve been careful to use colors of the same or similar values, the blended colors are rich and beautiful, not at all muddy. Stand back or squint to see how your sky begins to take shape on the paper.

If you see areas that need changing, use a foam house painting brush (the kind found at home stores, used to paint trim) to wipe out selected parts. Then simply re-establish your colors and blend again. The delightful part is that in places where values change you can lose the edges, achieving soft transitions along the edges and making the cloud shapes quite believable. After blending, remain open to the possibility that a somewhat muddy color might become a subtly beautiful shade if you add another layer over it and blend it in place. Don’t give up too easily!

For your second pass over the paper, begin to work back over the sky with a fresh layer of the same colors, starting with the darks (which will most likely be medium values) and working through to the lights again, correcting color if needed or adding new ones to give your sky some zing. Blend this layer just as you did the first. You can add many layers of blended color, but be careful not to overfill the grain of the paper. You’ll know you’ve gone too far if you find “dead” spots in the paper where it won’t accept any more pastel. If this happens you can wipe out with the foam brush, as described above, or use a small mask spray to place a fine layer of fixative in the immediate area and lightly work over that when it’s dry. As your skill in blending grows, you’ll learn to stop before overfilling the grain.

In the final layer, create details with the same palette of colors you used in the underpainting. Now is the time to catch the elegant edge of a translucent cloud or delicate trailing wisps of ragged gray clouds. If you’ve been wise and saved the white for last, you can create brilliance with touches of it in the appropriate areas. Your goal is to use less and less blending as you layer in details so that you actually create a three-dimensional quality in your sky and clouds, and recapture the sparkling glow of unblended pastels.

One word of warning: Blending on deep sandpaper causes sore fingertips that can even begin to bleed. If you’re new to this technique, take it easy at first. Over time you’ll know just when to stop, but in the beginning you can blend too much and not realize how much it will hurt. If your fingers are too sensitive, try blending with a Sofft sponge, plastic eraser, tissue paper, paper towel or wear a surgical glove or finger cot. Each of these will give different effects that you might like, but in my opinion nothing works better than your fingers. It’s also a good idea to wear a barrier cream to keep from absorbing anything harmful through your skin. When applying it, remember to scratch your fingernails lightly over your palm to be sure the cream is under your fingernails.

With a little practice you’ll be able to layer and blend pastel to create wonderfully soft clouds. This finger-blending technique is an easy way to catch the drama and beauty of the clouds and sky.

Soft Morning, 8.75 x 13.5" on buttercup yellow Pastelmat

Tuesday, March 30, 2010

Amazing Art of Arm Japanese Tattoo Ideas With Koi Fish Tattoo Designs With Image Arm Japanese Koi Fish Tattoo Gallery

Amazing Art of Arm Japanese Tattoo Ideas With Koi Fish Tattoo Designs With Image Arm Japanese Koi Fish Tattoo Gallery 1Amazing Art of Arm Japanese Tattoo Ideas With Koi Fish Tattoo Designs With Image Arm Japanese Koi Fish Tattoo Gallery 1


Amazing Art of Arm Japanese Tattoo Ideas With Koi Fish Tattoo Designs With Image Arm Japanese Koi Fish Tattoo Gallery 2Amazing Art of Arm Japanese Tattoo Ideas With Koi Fish Tattoo Designs With Image Arm Japanese Koi Fish Tattoo Gallery 2


Amazing Art of Arm Japanese Tattoo Ideas With Koi Fish Tattoo Designs With Image Arm Japanese Koi Fish Tattoo Gallery 3Amazing Art of Arm Japanese Tattoo Ideas With Koi Fish Tattoo Designs With Image Arm Japanese Koi Fish Tattoo Gallery 3


Amazing Art of Arm Japanese Tattoo Ideas With Koi Fish Tattoo Designs With Image Arm Japanese Koi Fish Tattoo Gallery 4Amazing Art of Arm Japanese Tattoo Ideas With Koi Fish Tattoo Designs With Image Arm Japanese Koi Fish Tattoo Gallery 4


Amazing Art of Arm Japanese Tattoo Ideas With Koi Fish Tattoo Designs With Image Arm Japanese Koi Fish Tattoo Gallery 5Amazing Art of Arm Japanese Tattoo Ideas With Koi Fish Tattoo Designs With Image Arm Japanese Koi Fish Tattoo Gallery 5


Amazing Art of Arm Japanese Tattoo Ideas With Koi Fish Tattoo Designs With Image Arm Japanese Koi Fish Tattoo Gallery 6Amazing Art of Arm Japanese Tattoo Ideas With Koi Fish Tattoo Designs With Image Arm Japanese Koi Fish Tattoo Gallery 6


Amazing Art of Arm Japanese Tattoo Ideas With Koi Fish Tattoo Designs With Image Arm Japanese Koi Fish Tattoo Gallery 7Amazing Art of Arm Japanese Tattoo Ideas With Koi Fish Tattoo Designs With Image Arm Japanese Koi Fish Tattoo Gallery 7

Pink & Yellow: At Home

I would say I'm not all that into girlie colors, pinks, pastels, and the like, but then I wouldn't be telling the truth. While I haven't used such shades in any rooms of mine in a very long time nor have I felt compelled to do so, there is a part of me that still has a soft spot for feminine color schemes.

Perhaps it is the arrival of spring or because Easter is right around the corner, but for some reason, I am finding myself feeling cheered by the combination of pink and yellow; the rooms below mix these colors to just the right degree.


Mark Burstyn Photography


Sunday, March 28, 2010

Where a naval officer ought to be...

So, we sail tomorrow. It'd sound really cool to say we sail at dawn, but we won't. Still, we're heading out. Awesome. After almost two years of terra firma, I'm ready to have steel and water under my boots once again.

It won't be easy, with reqs and passage planning and watches and drills and briefs and whatever else they throw our way. Luckily we get 4 days at sea, 4 days off for Easter, then another 4 days at sea, so nobody should die of sleep deprivation. The OIC (CO) doesn't want anyone to go without sleep anyway, so if people start taking too long on navigation planning he'll just put a cap on it. As someone smart once said and less-smart people keep repeating, planning will take as long as you have. My goal is to go down to two hours per passage, but that might be a bit extreme--I'll be happy as long as I stay under 3 hours per 10Nm.

I'm pretty sure I'm ready. I've got the theory part down, I got an almost constant stream of positive comments in the NABS, and the Navy has decided that at this point we're ready, anyway.

Our OIC has told us that it's possible, after our reqs are done and we're almost done with the sea phase, that some of us might get to act as full-blown OOW, instead of 2OOW as we'll be for most of the course. (The idea being we're 2OOW so if we screw up the OOW will step in and keep the boat safe.) It's pretty cool, because it means we might be in charge of a ship, for a watch or two, in just over a month. It's far away, considering how much we have to do before then, but it's an exciting idea.

The only cloud over our departure--literally and figurativelly--is that the forecast for tomorrow shows a thunderstorm in the afternoon/evening. And it should rain practically all week. I guess it's not too bad; we'll be in a nice enclosed bridge and everything. It's just that I don't really like restricted visibility all that much, and if it rains hard or there's fog because of the rain, we'll be in textbook ResVis. Not looking forward to that part.

In any case, I'm excited, I'm ready, and I can't wait to get moving.

I always get the shakes before a drop... The Ship's psychiatrist has checked my brain waves and asked me silly questions while I was asleep and he tells me that it isn't fear, it isn't anything important - it's just like the trembling of an eager race horse in the starting gate. I couldn't say about that; I've never been a race horse.
-Starship Trooper

Wednesday, March 24, 2010

CHAPTER SEVEN--THE SKY

The sky is the key to the landscape. It determines the quality and quantity of the light, the color unity and the value contrast of your painting. Most landscape painters begin with the sky for these reasons.
When painting the sky, remember that it’s the lightest value in the picture. Carefully analyze the value of the sky, perhaps using a red filter. It contains the sun -- the source of the light -- and clouds, which are light in value and color.
Desert Morning, 12 x 9"
Now analyze the color. Look at the quadrant of the sky containing the sun and compare the color there to the exact opposite quadrant. Notice that it's warmer in color and slightly lighter. Ask yourself what color the other two quadrants are, as well. The sky progresses from a warmer blue to a slightly cooler color, depending on the direction you're facing.


Depending on where you live, the value of the sky may be lighter or darker than you think. Our beautiful bright blue skies in New Mexico, or any high and dry climate area, can appear to be very dark, but you shouldn’t let your blue become a gloomy color. Keep it light and airy. Conversely, in more humid, lower climes the sky may appear to be quite light in color, but you shouldn’t over-lighten it too much. Make your skies colorful, controlling the value.


Summer Heat, 9x12"

Even when we know this, we sometimes need to be reminded of it: The blue of the sky is deepest at the zenith and lightens at the horizon. This knowledge can help to create the effect of the giant blue bowl of the sky looming overhead, darkest at its highest point. The atmosphere around our planet when seen from space proves to be a fragile layer no thicker than an eggshell, speaking proportionally. The darkness of the zenith of the sky is essentially the black void of space seen through a thin blue shell of air. As we rise higher in altitude, even less of this blue atmospheric layer colors the sky, so that you see more of the darkness of space through less of the air. In arid areas the atmosphere contains less water vapor, making for clear, bright skies. In humid parts of the world the increased water vapor, which is less transparent, causes the sky to be a milky, paler blue. At lower altitudes the sky is paler in color because there’s actually more air to look through before reaching the black of space. At higher altitudes the thinner air makes for brighter, intensely blue skies. Think of the difference between the panorama you see standing on the top of a peak in the desert southwest, where the air is thin and dry, and the view from a bluff above the ocean looking out to sea. Both may be dramatic and beautiful, but high dry air gives a longer view than does thick humid air.

When painting skies around my home I like to use a mixture of blue-violet and blue-green to create the color of the sky. I’ve observed that summer skies seem to lean toward turquoise while winter skies are more violet. However, I urge you to observe for yourself and analyze whether this is true. Such a benchmark may be helpful in choosing whether to layer blues that lean a bit more toward green or violet.

Last Snow, 9x12"
As strange as it seems, the sky will appear to be not so light on a bright sunny day. The reason is that the sunlight flooding onto it raises the value of the land plane. The difference between the land and sky values is less than when clouds add highly contrasting shadows. A gray-day sky is lighter in value than a clear-day sky because the clouds catch and hold the light, much as does milk glass, making it brilliant, almost glaring, compared to the clear glass effect of a cloudless day.

Tuesday, March 23, 2010

Daydream Believer

Around this time of year, I find myself dreaming of a getaway to a place drenched in sunshine and warmth. Where days move slower. And the most pressing event on my schedule would be an appointment with a few new-to-me novels and a stack of favorite magazines.


Images of this Croatian compound are feeding my current daydreams. I'd begin decompressing in the bedroom above with its French doors, herringbone tile floors, and neutral yet cheerful color palette.


After a luxurious afternoon nap, I'd happily spend the rest of my day drifting between the other spaces of the house.


I'd explore the garden, enjoy an outdoor meal and alternate between reading and talking with my companions.


After a long and full day, I'd grow sleepy sitting by a warm fire and when I turned in for the night, I'd fall asleep listening to the soft lapping of waves from the water below.


In the morning, I would wake to sunlight streaming through the French doors in the bedroom, and I'd enjoy the slow start to my day as I sipped my morning coffee in the garden. I'd then repeat the previous day's activities, with the remainder of my getaway passing in much the same way.


Rees Roberts + Partners LLC

I'd spent just enough time away that when it came time to leave, I'd find myself feeling rested. With a few more books checked off the continually expanding "to-read" list. And looking forward to getting home.

Game over, man! Game over!

So, after nine straight days in the NABS, we are officially done. Well, done with the simulators, in any case. The next time I step in them, if ever, is if I come back to NOTC as a CTO or if I get sent here to do the FNO course. (I actually wouldn't mind that too much.)

It's been fun, though intense, and I'm definitely looking forward to two days off and then to sea phase. I don't expect it to be easy, but it should be an adventure. I'm sure I'll get really trippy dreams after a couple days of minimum sleep.

In any case, I don't have much more to say for tonight. I just want to do a brain dump and not think about mental math, rules of the road, navigation or anything of the sort for 24 hours.

Second star to the right and straight on 'till morning

So, we've done NAV passages (on SDM! no more paper charts! BOOOOOOOOOO!), and have now moved on to OOW tracks, in unlimited daytime visibility, restricted visibility, and now at night. It's a bit of a challenge to move on to both unknown ways to operate (having never done OOW tracks) and an unknown environment (ResVis/Night), but it's also fun.

I'm on duty tomorrow and will have plenty of time to sit around with a big pre-sea-phase update for all three of you that still read my blog, but for now, I wanted to post about one of the numerous websites that let you get AIS data for our area of operations. I'm not going to post where we're going in advance (I'll post about where we've been, most likely) but if you want to follow my wonderful adventures on MOOSE 62, head on over to http://ais3.siitech.com/VTSLite/AView.aspx and select MOOSE 62 from the list on the left side of your screen. To check out what our consorts are doing, look at RAVEN, RENARD and COUGAR. I don't know if the other Orcas are going to be out while we're at sea, but you can check them out (ORCA, GRIZZLY and WOLF are shown on the map right now).

I can't wait, even if it means sleep deprivation.

Saturday, March 20, 2010

Promises, Promises...

Another week has flovn by leading to another week I've been absent here. Since Wednesday morning, I've been busy enjoying the company of my youngest brother who, sadly, leaves town tomorrow evening.


We still have much on our schedule before we head back to the airport, so I'm off to enjoy the rest of our quickly dwindling time together. Have a great weekend, and see you soon!

Friday, March 12, 2010

Make New Friends...

I met my best friend from childhood, Jenni, when we were five; we were in the same class at school and our mom's served as Room Moms together (they helped plan class parties and secure parent volunteers for field trips).

Not only did we become friends, but our moms became friends too. With younger siblings the same age, it wasn't long before our dads and siblings were brought into the mix, and our families began socializing on a regular basis.


Over the years, we created countless memories, the charmed childhood variety that in reflection almost seem surrounded by a golden glow. We shared vacations and dance lessons and found ourselves in the same classes at school more than a handful of times. We fought like sisters and certainly thought we hated each other at times.


When I was 9, I moved to a new neighborhood and a new school. Even though we didn't see each other as much, we still saw each other on occasion and remained friends. Three years later, Jenni's family moved to the same neighborhood where we lived, and I was excited to once again have her at the same school.

We continued to attend the same school for the next six years until our graduation from high school. During those years, we both had other friends and, at times, socialized in slightly different groups, but through it all, we never drifted too far apart.


Although we parted ways when we went to college and have not lived in the same place since, I am always proud to say she is my oldest friend; it is special to have someone outside your family with whom your history runs long and deep.


Last week, I slipped out of town for a number of days to return to the place where I grew up so I could surprise Jenni on her 30th birthday and see my other friends who still live there too. Although such trips inevitably pass too quickly, for the first time in a while, I was able to spend quality time with everyone I wanted to see.


I was reminded, as I always am when with old friends, how much it means to me to have people in my life who've watched me grow. With whom catching up is always easy. And laughter always comes quick.

And then I was reminded how very much I miss them.


While I'm thankful to have made the trip, the price for my long weekend away catching up with friends has been trying to playing catch up here all week! I'm sorry for my unexpected absence and hope to be back with more posts soon. Have a wonderful weekend!

Tuesday, March 9, 2010

EMERGENCY STATIONS, EMERGENCY STATIONS

Wow, has it been a month already?

So, Cliff's Notes of what happened since my last post:
  • I pwned assessed runs for formation manoeuvering, and had mentors and CTOs tell me that I'm a really good ship driver, and one mentor actually said I was "a machine."
  • We've been in Damage Control School since last Monday, doing fire attack team leader and OOD training. It's fun but tiring, especially when you're getting in and out of bunker gear and going on Dräger or CHEMOX every hour. Actually, CHEMOX kills you.
We're starting simulator runs for navigation and OOW watches next week, going from next Monday to the Tuesday of the following week without a break, getting a few days off, some sea prep time, then sailing for a few weeks. We've been told to expect hell and sleep deprivation for the first few weeks. Maybe it's like Hell Week for SEALs? In their case, though, they get fairly simple physical evolutions and only really risk injury to themselves; we have to do complicated mental operations and if we screw up, we risk injuring or killing dozens of people.

Also, I'm getting a taste of that whole officer/mentor gig I signed up for. I won't go into details because it's personal and confidential, but it's weird to be the one who's older, more experienced, and higher-ranked, and giving advice/help/input to someone. I know it's my job, but I've been in the training circuit for almost five years without really having to be in this position. Hopefully the people who have tried to mentor me and who saw that flicker of potential in me won't be disappointed.

I don't know how much I'll update before sea phase, but I'll definitely do my best to put together a "log" while I'm at sea and post it once a week, even if it's in a limited form through e-mail.

Until next time, keep your stick on the ice.