Entri Populer

Labels

Friday, December 31, 2010

Sexy Tattoo Girl

Good Tattoos aren’t cheap and cheap tattoos aren’t good. 
Getting a tattoo is a sign of independence and many tattooed women are proud to show their independence by sharing their tattoos with the world. You should get your tattoo design from only the Amazing Tattoo Girl. Spark your imagination and start creating an amazing tattoo art piece for yourself with thousands of high-quality designs to download.
Girls can look really sexy with just the right tattoo on their ankle. Tattoos can be flirty and feminine, or tough and enticing. With the right design and placement, a tattoo can change your whole look to make you appear more exotic and beautiful. But not just any ankle tattoo is a good choice.
Here are our recommendations.
 
 
This lovely brunette´s name is Sella Heartbreaker and I´m sure she could perfectly honor her name and break my heart in to a million little pieces with that perfect tattoo she´s got. 
This is perhaps a tribute to her single of the same title, which unfortunately didn’t become as popular as she hoped it to be. And here I am thinking she had more trashy taste in tattoos. I say this is a classy choice.


When one first thinks of the famous burlesque dancer, Eve Scarllet, tattoos don't necessarily come to mind. But Eve has a little secret. She has one tattoo and it is very noticeable and out in the open. Almost no one until now knew it was a tattoo. Thank goodness for the tattoo artist she spoke to because he talked her out of that regretful tattoo and suggested she get something a little more timeless and elegant.
Eve's beauty mark tattoo is not the only tattoo she thought about getting when she was younger.

Girls not only want to have fun with their tattoos, they also used them to express themselves. A hibiscus flower on the shoulder blade perhaps, a cherry blossom tattoo on the foot or a cute butterfly on the hip; whatever art she chooses, it can definitely add to her trendy and sexy persona.

MORE SEXY PICTURE TO BE THE KING ART OF TATTOO GIRL :


These are just some of the tattoo designs that would still look beautiful and interesting even if they are tattooed on a miniature scale. They are best when inked on small areas of the body such as foot, ankle, wrist, upper back, and even lower back and shoulder blade.

Thursday, December 30, 2010

Blue Ribbon

Writing and freely publishing this book has been a blessing in so many ways, and trust me, it's a gift to you but it also gives to me. None of us is selfishly giving, and that in itself is the reason it's so good.

This  morning I awoke early, blearily opened my email and saw a message from Katherine Tyrrell marked, 'you've won The Best Book by an Art Blogger Blue Ribbon (Making A Mark Awards 2010).' How nice, I thought. I hadn't had my coffee or spent time in the Bible, as I do every morning, and I was pleased. But it wasn't until I visited Making a Mark that I was absolutely bowled over by this generous recognition!


Please take a moment to go over to her blog and read the stunning company listed on that page, in order to understand how I feel right now. I must tell you that I have never considered myself and what I've written here as coming close to ranking alongside Richard McKinley or Deborah Paris. Their books are amazing! They're each consummate professionals, recognized widely and very authoritative. I respect each of them immensely and have had the pleasure of a certain amount of interaction with each of them at various times.

I think the thing that pleases me most is that it was the giving that tipped the balance. That wasn't me. That was the Lord. Some may not understand, while others no doubt do, but suffice it to say that I gave the book away as a gift to honor Jesus.

All the thanks I've received from people all over the world, and now this lovely Blue Ribbon, are His.

Deborah

Monday, December 13, 2010

Gesang Tattoo Studio

“Enjoying a hot afternoon around Legian, accompanied by bottles of wine and a nice chat.” Yes, our profile column this month features a man from the friendly city of Malang, whose hobby is to linger with wine (that’s what makes us feel at home to chat with him—ed.). Here is our relaxed chat with Gesang in the midst of busy life for tattoo, photography, and wine... Check this out.

Knowing tattoo from the roads, terminals, and markets association, he became interested in tattoo and the art around the year of 93-94. At that time, he was in high school and began to consider tattooing as a professional job when you were graduated from school. “In principle, all of which form the character of a person is their environment,” he said. Maybe that’s what determines the characteristics of a Gesang. He really likes the decorative pictures (painting), Maori, and biomechanics drawings.

Family and friends also said had been credited with making him as much now. Everything he learned in autodidacts only by pictures. Until finally in mid 99, he moved to Bali with only bring tattoo and painting skills. By becoming a freelance tattoo artist in Bali, many experiences have forged and made him like now. Starting from Dhodho Tattoo, Tattoo Gung De, and Ka’s Tattoo, until finally docked at Irezumi Tattoo which is now better known as Gesang Tattoo. Gesang had learnt a lot with them (Dhodho, Gung De, Rheno, Gus Tu).

According to this one-child-father, the family is a source of happiness and inspiration. Bali is the perfect place for tattoo because they closely relate to tourism. The big number of tattoo studios in Bali is not a problem, the proliferation of tattoo studios are not a hindrance or competition. “Every person has their own abilities, their own market, quality and fortune alone, everything is set by the God,” he said. Defining a work and compete fairly with the work, both promote tattoo. “Indonizing tattoo and tattooing Indonesia,” he added.

Gesang commented, “Magic Ink is a magazine that dared to make a breakthrough to advance the tattoo, as a media of reunion, friendship, and relationship.” He fully hopes that the Magic Ink would make the activities more often, and not too stingy to receive input from anyone, raise the educational contents, strengthen pages, to make society more familiar with tattoo, and hopefully be able to make them realize that tattoo is an art.

Sunday, December 12, 2010

Rossemarrie Tattoo Studio

Rosemarie studio dominated by red colour officially opened 2 years ago, at the end of 2008. Located at Benesari Street no.10x, close to the crossroad at Benesari. Thomas and Mada as tattoo artist of the
studio, Ferry, Nanang, Tony gimbal dan Gimbul as staff. Open everyday from 10am-10pm. Interestingly.. owner of the studio is togetherness, its mean that everyone who is working at studio is the owner.

Serves all motif of pictures with minimum prize 600k, depend to the size and difficulty of the picture. Use starbrite, intenz, and korusumi ink. The studio completed by medical sterilizer, internet, AC, TV, and waiting room. Mostly guests is coming from Australia. There is credit card machine at this studio, so if you want to make tattoo but you don’t bring cash money and don’t feel up to go to ATM, no worries because you can use the machine, but off course for customers only :D

Saturday, December 11, 2010

Wiz Ink Tattoo Studio

The studio that located at Kartika Plaza street (in front of Green Garden Hotel), opened about 4 month ago, at June 2010. Wiz Ink studio is comfortable and little bit into a shopping complex area, but don’t worry, they use sign board alongside the road. There are David as a tattoo artist, Bima Masquito as accounting and
Pak Nyoman Wiz as the owner. Use star brite, korusumi, intenz, dynamic, and eternal ink.

Of course they have medical sterilizer with international standard, and other facilities like internet, AC, wastafel, and sofa. The studio serves piercing, and receive calls to make tattoo outside studio. Open everyday from 11.00am - 10.00pm. Studio caters for all motif image by fixing the price / minimum price 500k (5x5cm), and also based on the large image size and difficulty level images. And one more.. this place is good for hanging out ;)

Friday, December 10, 2010

Bali Tattoo Artist: Marmar Herayuki

Being introduced to tattoo by his neighborhood community, a friend of his brother often made tattoos in Marmar’s house and brought tattoo magazines.Started from looking at the pictures in the magazines, Marmar began trying to draw on papers. Until the time when he was on high school, his friend brought full tattoo equipments and that was the beginning of his tattooing experiences, he started to make tattoos for his friends after school. Sometimes some parents of his friends came to his house and protested because their kids got inked by him. As time went by, he seriously pursued his interest in being a tattoo artist, ever worked at a tattoo studio in Nusa Indah, which was also his first tattoo studio. The studio was joined with a distro in one place. After almost a year working at the studio, Marmar opened a studio in his house for 2-3 years, and moved to Star Tattoo Legian, before finally he joined Suicide Glam Tattoo Parlor. It’s from this place he has learned a lot about management. He feels that Suicide Glam has influenced him in his character development as a professional tattoo artist.

As a tattoo artist from Bali, Marmar admitted that most Bali tattoo artists have good skills and can do freehand, but tight schedules make many of them not up to date. Different with tattoo artists outside Bali, Marmar has the opinion that their designs are up to date, and besides, they’re dare to spend time searching
new designs from the internet or magazines. For tattoo artists, Marmar chose Ibud and Shotonk as they create great works, while Ade Itameda is quite consistent and original in Indonesia.

Now, Marmar reruns the studio in his house, named Hellmonk Tattoo Studio, located in Denpasar. It’s cozy and capacious, not by the side of a big street, and so it fits for relaxing, far from the hectic atmosphere. Most of Marmar’s pictures use traditional figures, like Bali or Japan figures (these 2 kinds are the easiest to find in his gallery and being displayed in the studio). In creating a concept for his client’s tattoo design, sometimes Marmar has a unique habit. He will draw while listening to the client’s favorite music, or by summarizing a story based on his conversation with the client. Besides being busy with his new studio, Marmar also make things for the studio displays, and of course music. For him, music is something he cannot leave behind.

Tuesday, December 7, 2010

Blogger Stumbles into Assange Media Scrum


By chance, I found myself in the middle of the international press scrum surrounding the first court appearance of Julian Assange at the Westminster Magistrates' Court today. I'm not sure what this has to do with the project described in this blog, but the incident occurred after spending a lot of time in Westminster observing the general increase in police activities.

Monday, December 6, 2010

Lauren Conrad Tattoos

Lauren Conrad is a lovely cute American television personality, author and fashion designer, best known for her part on the reality series Laguna Beach: The Real Orange County and The Hills.

Lauren Conrad has a couple of tattoos which we known about, including her most recent design which reads "Sticks and Stones" located on her lower back.

She also has the letter "J" tattooed on her right hip, which has since been changed to the letter "L" after breaking up with a former boyfriend.

See pictures of Lauren Conrad's tattoo design below.

Lauren Conrad Tattoos

Lauren Conrad Tattoos

Sunday, November 14, 2010

Seminyak Ink Tattoo Studio

In addition to many Villas Seminyak. On the road there is a tattoo studio Seminyak named Seminyak Ink. Only difference Seminyak Ink is not aired on television during tattooing. Perhaps because our TV stations that have not been seen towards the art of tattooing for commercialized like Miami Ink.

The new studio 3 month stand has a unique interior spaces. Indeed, the existing facilities are not much different from other studios, it's just kind of spatial and interior materials used in Seminyak Ink different from the others. When I first entered into the cool and cozy atmosphere are felt in Seminyak Ink.

All existing equipment in Seminyak Ink is in direct import from Australia. Starting from the needle to ink all of Australia, since the owner of Seminyak Ink comes from Australia. Seminyak Ink tattoo artist to have two, namely Ableh and Leo. Want to create tattoo style Bio Mecanic or Maori? Ableh tepay choice for tattoo styles such.

For Ink Sminyak price starts from Rp. 300.000, -. Depending on the size of tattoo and tattoo design level of difficulty that will be created. And if you make a tattoo reached the price of Rp. 1.000.000, - you will get a free t-shirt from Seminyak Ink. in Seminyak Ink also mealayni jasi body piercing. So .. what are you waiting for? Just walking in Legian and Seminyak make tattoo at Ink.

Sunday, November 7, 2010

Thanks...

I just wanted to post my gratitude for the many well wishes and thanks I've received for the book. 

It was a "labor of love", first from the standpoint of one who loves this vibrant and lively medium, and loves teaching others a few of the things I've learned about how to paint the landscape, but mostly out of love for Christ, who gave me a modicum of talent and provided me with the opportunities to explore and enjoy using pastels. It was His example that showed me so clearly that I wasn't to hold out, hold back or expect to gain income from the book, but that in giving it away I would gain more than I could ever expect otherwise. The truth of that is difficult to prove, but it's real nonetheless. Your thanks are truly appreciated.

Although due to family needs I have few chances to spend time in my pastel studio, I continue to teach classes once a week with a devoted group of students, and I pursue painting in gouache on my little dining room table. My mind roves over the landscape and technical areas I haven't yet explored in this book, and as a result I have several additional chapters brewing. I sincerely hope to write them and post them here as an appendix, of sorts.

If you have a question or idea you would like answered, or would like to propose an additional area of study in the landscape as its painted in pastels, I welcome your thoughts. Please understand that for the present I'm not in the process of writing, but as I teach and post on Today's Art Class blog, much of what I hope to write is beginning to coalesce.

And in the nearer future, I hope to begin offering online workshops in the landscape in pastel. Look for that to come to fruition in 2011 sometime. I'll post opportunities here as they arise, but if it's something you're interested in doing and you have a particular subject you'd like to explore (i.e. sunsets, reflections, snow, night, etc.) send an email to me at d.d.secor(at)gmail(dot)com and I'll add you to my mailing list.

If this is your first visit here, please page through the Table of Contents Links in the sidebar. If you're new to pastels, you might want to start at the beginning and explore the possibilities in order. Perhaps you're struggling with a particular subject and stumbled upon the information using an Internet search. Either way, I hope what you find here is of help and interest to you.  

Every student is a blessing to me. Teaching is a delight, and freely sharing even more so.
Deborah

Wednesday, November 3, 2010

Indonesia Professional Tattoo Association

IPTA which is a continuation of Indonesia Professional Tattoo Association in the form at the beginning of September 2 years ago from discussions with several friends in whom you King of Cirebon, Agus Budiyono, Alexander or Julius Sahetapy, Febri Hamonangan and Arif felt necessary to build a container community little organized so that hopefully can become a lamp to bertattoo community and society at large. Newly organized community is needed to answer the challenge of bad stigma of society against those who bear the tattoos and tattoo.

A different approach, it is trying to offer. Berbalikan approach 180 degrees from what is generally already often you see the tattoo community in general. This is necessary because despite the many organizations / communities that exist but almost all do a similar approach similar to that in the view of our community will be less successful in large scale.

A different approach from us is what is our original idea that most likely also eventually be annexed by other organizations during this
relatively near-death or barren. If that happens then it is very encouraging although the action is less attractive. The approach is to try to change brought
ourselves as far as possible within the normal values prevailing in society than that in general is trying to force the public to accept all
value of "eccentricity" of people who bertattoo. It also tried to organize ourselves with an emphasis on the way / pattern clean work so that it can help people who deal directly or domestic authorities are comfortable with our presence. This approach is

Members of IPTA is not much, very little is possible if compared to the community or other organizations about 18 people but the number is not a barrier to make a positive contribution to organizational goals. Most members are in Jakarta, although there are also some outside Jakarta. We IPTA hopes to become a minority carve a very strong color that can affect the other colors around it. We do not want to be the color of the most widely inscribed on a canvas
but the colors are slightly used but gives a strong impression. IPTA does not want to just pull the membership dues without giving a clear direction and a less significant benefit to their members and therefore the amount is not our focus, framework and work ethic is a priority that must be arranged prior to increasing the number of memberships.

Requirements that we apply simple prospective members have the same vision with organizational vision and prospective members are also not registered as a member of another organization to avoid any conflict of interest and then another thing is the prospective member does not have a problem with the attitude that a plaque for their generally calling themselves tattoo artist and are willing to pay membership dues and accept our rules.

This organization has a management arrangement which is headed by a chairman and then underneath there is treasurer and secretary. While still very simple arrangement also related to the number of members who put in and the consideration of flexibility and speed of decision making. However, the composition of the management of a wider and comprehensive
will be formed if necessary.

These organizations conduct routine activities in the form of monthly meetings to discuss related matters and problems of internal organization members. This annual event a tattoo contest, which is a tool members to practice and test her progress. IPTA is the youngest organization that carries out first tattoo contest in Jakarta. This event has been held twice since the first time in the year 2009.

Vision and mission of this organization is memberdayaan the stake holders in the tattoo industry in Indonesia, especially in the fields of health, education, profession, social and professional organizations ekonomi.Keberadaan which will certainly give more vibrant colors and beautiful if properly interpreted. But surely there can not be denied that the parties interpret it backwards. Hopefully this does not become a significant constraint on the way this organization forward. Similarly, the presence of Magik Ink tattoo magazine into the constellation of the tattoo industry in this country would at least have brought a fresh breeze that if utilized properly could bring progress. Intermezzo intermezzo necessary but life is not a means to return to the Magic Ink for itself whether to put forward the priority elements of an entertainment or education, course material will reflect that carried these things and although it may seem cliche or classic, we also hope that this magazine be in the forefront in our community to curb moral decadence and the disappearance of national identity.

Our hope is Magic Ink magazine can better weigh the maturation of its readers so we may hope also that the parties involved in
This tattoo world in Indonesia became more adult and mature and can give a positive color for the life of our nation. Go ahead Magic Ink!

source: magic-ink vol.10

Monday, November 1, 2010

Bali Dreamz Tattoo

Bali Dreamz Tattoo, established 1 year ago at August 2009. although the studio only 1 year, but the tattoo artist already + 17 years. Placed at Jl.Wana Segara, Tuban kompleks Pertokoan Wana Segara Kav.8. Open from 10 AM – 10 PM. There is 2 staff that manage the studio and accept booked by customers that mostly coming from Australia. For price starting from 800K/hour. In a month, around 20 people or customers come to the tattoo studio, and SongCat as an artist will be ready to serve. For needle, imported from Australia and they use eternal ink imported from America. Anybody who like to have tattoo just come to the studio or call (0361) 763178 0 763174 – 081237675231

in bahasa:

Studio tattoo satu ini baru berdiri 1th lalu, tepatnya pada bulan Agustus 2009. Meskipun baru 1th buka, namun artistnya sudah berkecimpung di dunia tattoo + 17th. Nama dari studio ini adalah Bali Dreamz, terletak di Jl. Wana Segara, Tuban Kompleks Pertokoan Wana Segara
Kav. 8. Buka dari pukul 10 AM – 22 PM. Selain itu, terdapat 2 staff yang mengatur studio ini beserta pesanan / bookingan dari para pelanggan-pelanggannya / para new customernya yang sebagian besar berasal dari Austalia. Bali Dreamz Tattoo juga mempergunakan tarif, start at 800rb/jam. Dalam sebulan sekitar 20 orang mampir ke studio ini, dan SongCat sebagai artisnya akan siap melayani. Untuk jarum, mereka mengimport dari Australia dan untuk tinta menggunakan Eternal yang diimport dari Amerika. Bagi siapa saja yang mau melukis tubuhnya
dapat langsung datang ke studio ini atau menghubungi no. (0361) 763178 / 763174 – 081237675231

sumber: magic-ink vol.10

Saturday, October 30, 2010

3 Datu Tattoo Studio in Bali

A tattoo studio which is named 3 Datu tattoo studio, was opened in around 2008. 3 Datu itself means the three elements, namely the creator, maintainer and buster. This studio is located in North Padma, with Wayan Wijaya Enteg as the owner, Koming Chao as the tattoo artist which assisted by Manix and Leonk. This studio is also equipped with air conditioning, medical Sterilizer, Internet, and waiting rooms. Price determined by size, and difficulty level of the images itself. Most of the customers are come from Australia. They won’t receive any outgoing tattoo orders anymore, except for some close friends, because once, the artist almost been stabbed by a customer for some less obvious reasons, when receiving an outgoing tattoo orders. For you who are interested in the work of this artists (could be seen in www.3datutattoo.com) just go directly to Jl Werkudara no. 513, or you may contact the 3datu_tattoo@yahoo.co.id.

Indonesian version:

Studio yang dikasi nama 3 datu tattoo studio ini mulai buka sekitar tahun 2008. Diberi nama 3 datu yang artinya adalah 3 unsur yaitu Pencipta, pemelihara dan pelebur. Studio ini terletak di daerah Padma Utara, dengan Wayan Enteg Wijaya sebagai owner, Koming Chao sebagai tukang tato dan di bantu 2 orang staff, Manix dan Leonk. Studio ini juga sudah di lengkapi dengan AC, medical sterilizer, internet, dan ruang tunggu. Harga yang dipatok berdasarkan size,dan tingkat kesulitan gambar. Sebagian besar customer yang datang berasal dari Australia. Tidak menerima tato panggilan keluar studio, kecuali teman-teman dekat, karena pengalaman buruk sang artist pernah nyaris ditusuk salah satu customernya karena alasan yang kurang jelas, ketika menerima tattoo panggilan. Dan mungkin untuk kalian yang tertarik dengan hasil karya sang artist (bisa di lihat di www.3datutattoo.com) langsung saja menuju ke Jl Werkudara no.513 atau bisa kontak ke 3datu_tattoo@yahoo.co.id.

Sumber: magic-ink vol.10

Friday, October 29, 2010


In summary, the SDSR outlines 8% cuts to the British defence budget with
the Royal Navy reduced by around 5,000 personnel, the British Army by 7,000, the RAF by around 5,000 and civilians reduced by around 25,000. Even the Telegraph admits that the MoD got off lightly in this months round of public sector cuts. RAF Kinloss in Scotland will close and Tornado fighters at Lossiemouth will transfer to the UK in a somewhat half-hearted bid to centralise and consolidate the strategic distribution of airbases around the UK. Other RAF bases may be 'repurposed' for use by the other armed services, and the massive MoD training site proposed for St Athan, Wales, is on permanent hold. All of which means that there will be very little difference to the overall size of the defence estate

MAGIC INK TATTOO CONTEST 2010

Sabtu (21/8), Magic Ink menyelenggarakan untuk pertama kalinya event Magic Ink Tattoo Contest 2010, terbagi menjadi 2 kategori yaitu Black & Gray dan Color, dengan mengambil tema Extreme Fantasy. 38 peserta yang didominasi studio tato di Bali dan juga beberpa peserta dari luar bali (malang, surabaya dan semarang) berebut 2 tempat terbaik di masing-masing kategori.
Dimulai sekitar pukul 11 siang, dan diisi oleh deretan band-band lokal Bali. The Rolic membuka acara..disusul The 2nd Home, fight back.. dan Dreizehn bikin suasana jadi luluh lantah oleh gempuran distorsi berkolaborasi dengan suara desing mesin tato. Nosstress naik panggung menenangkan suasana. Roy Parsua dan Angga El’Diablo sibuk sendiri berkolaborasi dipaha model mereka

Setelah itu penjurian dilaksanakan, jajaran juri diwakili artist tato (Ibud, Abuth, & Daplonk) lalu dari kalangan pelukis (Welldo) dan dari komunitas Sketch (Dede). Sambil menunggu perhitungan hasil penilaian, Pengunjung mendekat ke area Body Suspension dari Albar Tikam Suku Suku Tatau dan Oni Killcat.

Dan akhirnya hasil penilaian keluar dengan pemenang di Kategori Color adalah Mangku dari AS Tatto sebagai juara pertama dan Toge dari Radjah Skin Design diposisi kedua. Dikategori Black & Gray, Andre dari My Liberty menjadi juara dan Agung Star Tatoo ditempat kedua. Untuk best extreme fantasy dimenangi oleh Andre dari My Liberty melalui hasil voting penonton. The Hydrant yang hari itu menjadi bintang tamu, tampil terakhir sekaligus menutup acara.

Warung Kang Jaka berubah menjadi arena komunitas tato hari itu, ditambah lagi komunitas Harley yang datang siang itu, Ular-ular dari komunitas Barong, dan para tato artist yang sibuk menggambar di kertas menggunakan pensil arang..Thanks buat support para sponsor dan tentun saja para peserta dan pengunjung..Rock On..!

Sumber: magic-ink vol 10

Wednesday, October 27, 2010

How to choose a tattoo studio

So you have decided about the tattoo design and the location of the tattoo on your body. Now it is time to select the right place where you can get it done properly. Of course it is the tattoo studio but you should check the following in this regard...

  • You should first of all check the Tattoo Artist certifications.
  • You should check the autoclave and sterilization certifications
  • You should make sure that artist wears protective gloves.
  • You should be sure about the cleanliness of the equipments that are being used in the process of tattooing.
  • You should properly observe that the ointments, ink and water used for the purpose are taken from separate and clean containers.
  • You should insist that sterile or new needles should be taken from an autoclave bag in front of you.
  • And after the use the needles should be disposed off appropriately.
  • You should also insist on the use of fresh inks used as the color of the tattoos.
  • Also make sure that each color of ink comes from a bottle that is poured into a small cup specifically for your tattoo.
  • Satisfy yourself by ensuring that neither a needle is reused nor the remains of prior used ink could be used on you.
  • You should see prior designs of tattoos made by the artists in the studio.
  • You should allow the Tattoo Artist touch your skin only after being fully satisfied about his talent.
  • Never mind even if it takes a long time to find a neat and clean parlor as well as the artist.
  • After all it is the question of health and hygiene.

Girls Tattoo by Bali Tribal Tattoo Studio

Butterfly Tattoo Designs


Bunga Kembang Sepatu + Kamboja Bali DesignBunga Kembang Sepatu + Kamboja Bali Design


Flowers Tattoo Design on LegFlowers Tattoo Design on Leg


Kupu-kupu Tattoo DesignsKupu-kupu Tattoo Designs

Tuesday, October 26, 2010

Tuesday, October 19, 2010

Gouache Paintings in Small Scale--launching a new medium

Although I have not and do not plan to print or sell the book "Landscape Painting in Pastels", I have designed a modest little book containing some of my gouache landscapes, which I want to share with you.

It's quite a nice little softcover book. Most of the work shown is landscapes, although I included some of my still life and floral paintings. There are 68 paintings and three step-by-step demonstrations (all landscapes), as well as the text of the article that was in Watercolor Artist magazine in February, called Emergency Inspiration Kit. I've had a lot of paintings shown in magazines, due to my association as a writer for The Pastel Journal, The Artist's Magazine, and Watercolor Artist over the last 12 years, so I was a bit skeptical about the quality that an online publisher such as Blurb could produce. I worked hard to lay it out so that the paintings are life-sized. The book itself is only 7" x 7" in size. The intimacy of this scale is well suited to showcasing these 2.5" x 3.5" paintings.

So let me reiterate that although this is not a big, impressive book, it is a very nice little collection of photographs that pretty accurately represents my paintings, and I'm most pleased with it. I'm quite happy to offer it for sale to anyone who is interested. I kept the price modest, of course, and you can preview every page, so you'll know what you're getting.

I'm so pleased with the quality of this small book that I plan to design one devoted to a retrospective of my pastel landscapes in the near future, but I hope you'll enjoy seeing my most current work in gouache.

I hope you enjoy it.


Friday, October 15, 2010

The End

Now that the book is concluded I want to acknowledge the help and support of my family and friends.

My husband Dan has been of immeasurable assistance to me every step of the way. He helps me to keep my priorities straight, guiding me gently and lovingly to see the Lord's will in my life. I can't tell you how many times he has taken a question into consideration, prayed and then come back to me with wonderful Scriptural support. We discussed at length publishing this book free of any charge, giving it away to all, something many people would have viewed as merely an opportunity for income. Dan saw the bigger spiritual picture first and urged me to live what I believe. Thank you, my love.

I also want to mention the ways my son, Chris, has been of service. He's one of my finest critics and most supportive fans. He's honestly looked at my work, asked some good questions, occasionally attended classes I taught, and has always reminded me that I'm an artist, in addition to being a child of God, wife, mom and daughter. Thank you, kiddo. Sometimes I need to remember that.

Each week as I've posted these chapters I've also relied on the expertise of Phil van Hulle. We met online at WetCanvas, where he volunteered his considerable experience and expertise in editing the chapters. Anyone who writes knows the value of excellent editing. At first I reviewed all the changes one by one, but in a very short time I recognized that each change clarified what I was saying and was very respectful of the content. Soon I simply clicked on the 'accept all changes' button quite confidently. Phil, thank you so much.

And I want to thank all of the readers up to now and yet to come. I've received so many wonderful messages from people telling me they are learning and trying new things. I'm delighted to know how these chapters help the beginner get started or the more experienced artist move forward. I've even heard form a couple of seasoned pros that they're enjoying the exploration of some subjects.Your encouragement means a lot to me. Thank you to each and every one of you.

I've said it for years to my students. Now let me say it to all of you:

It's looking good. Keep going!

Deborah Secor
Albuquerque
October 15, 2010

Wednesday, October 6, 2010

CHAPTER THIRTY-FIVE -- THE FIRST GALLERY


 Portfolio--present all one genre (remove the portrait.)

The long-planned day has arrived. Today is the day you approach your first gallery. You’ve painted those six excellent pieces, had your mentor critique them, and have them nicely framed. You’ve shopped the galleries to find the top four in your target market and found the one you most want to show in, as well as determining how it reviews work. You have business cards, a brochure with some details about you and your art, a résumé listing the few shows you’ve been in, and an artist’s statement, all organized in your portfolio alongside excellent photos of your artwork. Now all you need to do is show the work and pray like crazy it’s accepted.

If some of these suggestions seem daunting, I suggest you take some time to study information devoted to marketing your work. There are some excellent resources in print and online explaining the ins and outs of making cards, brochures, portfolios and prints, not to mention articles in arts magazines with handy tips and cost-cutting information. Be sure that whatever you do fits your personality and artwork. Try to think things through from the point of view of the gallery owner or director before entering the door.

I suggest framing five paintings in three sizes, two small, two medium and one large. Show paintings that have a cohesive look, presenting a nice show hanging together on a wall.

  • Choose paintings that show consistent style. (Yes, you do have a style, even if you can’t identify it. Ask someone else to help you select the work if you can’t be objective yourself).
  • Select work that overlaps certain colors or themes, but isn’t all identical (not six sunset paintings). Even if it’s your favorite painting ever and won a prize at the fair, if it sticks out as being too different it won’t complement the showing.
  • Stick with one genre: all figures in the landscape, all still life, all portraits. This gives the gallery an identifier they can use to sell your work. Later you may add other subject matter.
  • Be sure that your paintings are framed in a style that suits the area. Look around at what’s selling before you frame your work and take mat color and style of frame into consideration. Frame all of the work in similar frames and mat colors. You want a consistent, professional look, not a garage sale look. 
  • Have reasonable prices in mind for each piece, taking into consideration the 50 percent commission fee you’ll likely give the gallery. Once accepted, don’t hesitate to ask the gallery director or owner whether these prices are in line with what she expects to get, or whether they want you to go higher or lower. Be flexible -- you’re getting valuable advice from a professional you plan to do business with, so such questions show you respect them.
Contact the gallery via e-mail, or call on a weekday morning, to ask about their policy for viewing new artwork. Some galleries schedule a review day; others are more flexible. You will most likely hear that they are not seeking new artists at this time. Don’t let that discourage you.

ON THE DAY

If you are given a review date, ask what to prepare and arrive on time with everything they request. If you decide to walk in and discuss the possibility of showing with a gallery director, qualify the galleries you’ve chosen before going there. Make sure it’s the right place, or at least in your top four choices.

Prepare to go into the gallery at a very quiet time of day, with a relatively small portfolio. Dress professionally, relative to the market you’re entering. Don’t go in your paint spattered, ripped jeans or lug in a large framed painting. You should be able to carry your portfolio in one hand or on a strap over your shoulder. The sales clerk or director will spot you as an artist a mile off, so don’t try to pretend to be a shopper. Ask if it’s possible to speak to the director or owner. As soon as she approaches, tell her your name and identify yourself as an artist looking for representation. Smile, look her in the eye and be prepared to hear that they are not accepting work at this time. Ask when and how she reviews work. Have a business card ready to hand her with a smile, and offer to leave photographs, if she seems interested. Prepare a small photograph album containing your ten best paintings in a cohesive style, labeled with title, size, and medium. List your contact information inside and offer to leave it with the director if she isn’t open to reviewing work.

If she’s open to discussion, take the time to talk. Ask questions about the work or the gallery. A little schmoozing is acceptable as long as it doesn’t take too much time and doesn’t draw the director away from clients. Ask if you can show the photos of your work, but have a small framed painting inside your portfolio, too. When you open the zipper to retrieve your photo album, make sure your painting is visible. If she is interested in seeing your artwork, do not spread paintings around the gallery floor unless the director tells you to, and never, ever interrupt anyone working with clients. You’re there to support the work of the gallery. Your spouse or a friend should help you retrieve paintings, and hold back all but the two you carry in—your two best, of course.

As you show the work, talk about what you do. If this idea is hard for you, discuss with your mentor or a friend two things you can point out about each painting. You want to give the gallery a sales pitch they can give to a client, something like the location of the subject matter, a special color you used, or an experience you had painting it.

ACCEPTED

The director just asked you to consign work. Now what? Be prepared to read over any consignment contract the gallery may want signed, which is for your protection as well as theirs. Don’t quibble over details unless you feel that what they’re suggesting is outside the norm. Read sample contracts so that you’re clear on what’s standard. There are many showing online that you can peruse ahead of time.

Carry two copies of a short, simple consignment form in your portfolio, left blank so that you can fill in the gallery name and address, as well as the titles, sizes and prices of your paintings, should the owner want to take the work immediately. Most often a gallery will offer you a form, since paperwork is part of what you’re paying them to do. Don’t be afraid to ask about policies such as how often the gallery pays its artists and whether it sends notice when nothing has sold. (Most don’t.) This is professional and expected.

They want to accept all your paintings today and ask if you can deliver a few more in a week or two. Many galleries prefer to have some back stock so that they can rotate work or show interested customers more paintings. Be prepared ahead of time. Have three or four additional paintings stored at home ready to frame. If you don’t have the work, be honest and let them know when you can deliver it. Do not run home to paint four more and try to deliver them in a week. It won’t work, trust me. If you have work available, show photographs or agree to send digital shots via e-mail as soon as you can. It’s best to develop a good working relationship with the gallery by asking which paintings the owners want to show. You can always slip in a couple of your other painting subjects when you consign, if you don’t mind framing them at the risk of having them turned down. Determine some standard sizes you will use so that you can replace one painting with another.

It’s always a good idea to ask when the gallery would prefer to accept deliveries of your paintings. Some busy galleries won’t consign on Saturday afternoon, for instance, so be sure to let them know when to expect you, and arrive on time. Whenever you show up at the gallery, carry framed work in with cardboard corners in place. (I carried my framed work in homemade canvas bags for years, sized to accommodate three or more paintings that I could easily transport myself. This allowed me to come in quietly and unobtrusively, without making too many trips, and I could quickly corral corners to carry away when finished.) Ask where they would like you to place the paintings. Stack your consigned paintings in one spot and request that the sales clerk or director sign your already-filled-out consignment form as you count and read the titles of the paintings to her. You can always line out anything that isn’t consigned, and initial beside the title, if she doesn’t want it. Even if the gallery has paperwork it wants filled out, I suggest you have a neat little consignment form of your own. If nothing else, they can copy titles and sizes from your typed copy. Save them time, trouble and hassle!

Once your business is transacted, clear out anything taking up space, and if you have time return to the gallery to look at the work. Notice the prices, review the framing styles, look at the lighting, the displays, etc. You’re in partnership with the gallery to sell work, so take note of the business. Ask what’s selling, and admire the work you see. Keep a consignment list in your pocket and check your inventory to see that it’s displayed, that the price is correct, and that it’s clean and well-lighted. If needed, problems with any of these issues can be taken up later, over the phone or via e-mail. Take a photograph of the wall holding your work for future reference, if the gallery doesn’t object.

CONCLUSION

There’s far more to dealing with galleries than I can detail here, of course. Some have likened a gallery-artist relationship to marriage, and there’s some truth to that -- aside from “‘til death do us part.” Your job is to provide good work, ready to display, in a timely fashion. Their job is to represent you well and show and sell your work. Each partner must do the job well to make the relationship flourish.

When you encounter problems, think through how you want to solve things and approach the gallery personnel with respect. Remember that you’re one of many artists they deal with, so try to maintain a strong working relationship that’s built on mutual benefits. Determine that above all, as much as it depends on you, you’ll keep your word and try to consider things from the other’s point of view.

When you find a trusted gallery owner who can market your work well, you may develop a longtime working relationship that benefits both of you. The bottom line is to always seek out how you can support the gallery. Be sure to express your appreciation for the hard work the owners do. Thank them for sales -- send an e-mail or write a little note once in a while. You are in this together.

Wednesday, September 29, 2010

CHAPTER THIRTY-FOUR -- ART FAIRS

You’ve been painting in pastels for a while now and have taken some classes and workshops. Your teachers have encouraged you, some of your work has been accepted to a national show, and even though you haven’t won any prizes you know it’s time to start making a little money with your art. A good next step might be to begin with an art fair. Art fairs, or booth shows, are a great place to embark on selling. Shows allow you to step into the sales arena with a relatively modest cash outlay, effectively introduce your work to a local audience that can be receptive and supportive, and help you find the price range and niche your work may fill in the marketplace. Being accepted to a fair may be the boost you need to get your paintings finished, framed, priced and ready to sell, and could provide the opportunity you need to be seen by galleries as a selling artist.

First consider local shows. If you can, attend the show and take detailed notes about what you see. Try to picture yourself showing there. Ask the promoters or participating artists what has been provided. If this is an outdoor show, find out whether the artists supply everything from the ground up or if a structure is provided. Notice whether aluminum display panels, pegboard sheets or other walls are in place. Most of the time there are small tables or cabinets where customers may pick up cards or brochures and the artist writes up sales. Take note of the height, style, and sizes used to decide what works best. Look at the chairs. A tall, folding director’s chair is often the best choice, as it allows the artist to sit at eye level with customers.

Once you’ve found a show that interests you, request a prospectus. The application should tell you a lot about the show, even if you haven’t been able to attend. For instance, is the show held outdoors or indoors? Do you have to provide your own display system or tent? If this is an outdoor show you’ll need weather protection for your pastel paintings. Determine whether you can you drive up to a booth to drop things off, or will have to carry everything in from a parking area. Find out the cost of entering the show and the cost of the booth, including all your options. In a juried show you submit slides or photographs, or present examples of your work, and there’s usually a jury fee that is separate from the booth fee. You need to know exactly what you will get for your investment.

You also want to know a few things about the show and its history. How long has the show been in business? A successful show will have a good track record. How many artists do the promoters plan to host? You’ll be sharing the available dollars with the other exhibitors. Do they intend to balance art and craft exhibitors, or is this exclusively a painting show? The kind of work featured will determine the response from the community. Notice how many days the show runs and what hours it’s open to the public, and find out whether you may safely and confidently leave your paintings in your booth overnight or whether you’ll need to take down the show each day. If you were able to attend the show, refer back to your notes. What was the venue and were there many people attending? What physical set-up worked best? Were there walls or curtains dividing the booths? Most importantly, could you picture showing your art there?

Once you have applied to and been accepted to a fair, you have some important decisions to make. You will need to look into the various methods for displaying your work. Most artists use flexible, lightweight display panels that may be broken down and carried easily, but provide attractive wall space. Outdoor fairs often require you to provide your own tent, as well. Your notes should give you some ideas of what artists do at these shows. Consider the need for lighting, if the show continues into the evening hours. Be prepared to deal with weather considerations, as well.

You need to exhibit a range of sizes and prices. If you’ve already sold work in an exhibit use that as your foundational price. If not, you’ll need to decide on a fair price for your work. Review the notes you took where you carefully logged the prices of work similar to your own and be fair in your pricing. Don’t undersell too much or unduly overvalue your paintings. Decide whether you are willing to sell your pastels without a frame and if so at what price. Think about the possibility of taking commissions for your paintings if your subject matter warrants. If you’re willing to do this, establish your deposit and payment policy.

A fair is a wonderful opportunity to advertise your work. Show promoters may offer you a chance to advertise in their bulletin, an effective way to get your name in front of everyone who attends. Be certain to have excellent business cards with a color photograph of one of your paintings, as well as your name, phone, e-mail address and web page on them. A brochure that tells about your history as an artist and features more of your work can be made on your computer. You can use the show as a chance to build your mailing list, so put out a guest book where customers can record their name, e-mail or mailing address and comments. Be sure to send thank-you notes to anyone who buys a painting, no matter the size or price. This is a great way to build good customer relations in your community so that you can continue to enjoy the life of a selling artist.

Wednesday, September 22, 2010

CHAPTER THIRTY-THREE -- CRITICIZE YOUR WORK

Self-criticism is a skill every artist needs to develop. The ability to look at your work dispassionately and see clearly its strengths and weaknesses is a tool that serves the artist as much as her easel or palette. The goal is to be honest without being overly brutal -- or too lenient.

It’s difficult to determine why it’s easier to dislike certain parts of a painting than it is to find those we value. However, most of us can go more quickly and easily to the things we don’t like about a piece. We need to develop a means by which we can evaluate the painting, something we can rely upon to help us find problems and see where we need to enhance our skills.

THE GOAL

Each painting should have an objective, some target you’re aiming at in this single piece. Setting goals helps you know where you’re headed and how close you came to hitting the mark. Your goal might be broad, such as painting realistically or capturing the quality of an object or mood of a place. Or it could be as specific as having put the detail in all the right places or utilized heightened contrast in value. You might be attempting to paint new subject matter, say landscapes, or trying out a new kind of paper or other materials. You might be attempting to use more brilliant color or broken color, or perhaps you need to concentrate on painting foregrounds or perfecting trees. Whatever the issue, first ask yourself where you were heading and where you ended up.

You must try more than one painting to achieve any goal. Challenges take work and time. If after your first attempt you’re not satisfied, look carefully for those things that worked and why they worked, then paint another one that aims at the same purpose. Most of us are not likely to succeed on the first try -- and even when we do, that probably will not give us the skill to be able to do it again. So don’t give up. Dare to keep on trying.

Hold onto your first attempts at something new in order to be able to compare later on. Consider this “research and development” a good way to approach something new. You can more clearly evaluate your progress when you have a basis for comparison. So slide the first attempt or two under the bed or into the back of the portfolio and pull them out later on so that you can see how far you have come.

THE EDGE OF THE CLIFF

Be willing to learn things you don’t know. This is a lot like walking to the edge of a cliff in the fog, not knowing how far you might fall. Until you’re willing to risk failure, trying something that you’ve never done before or something that you have had no success with in the past, you can never learn it. Many times we stand at the edge of the thing we don’t know and imagine it to be a cliff when it’s only a curb. The failure can be relatively painless in the face of what we can learn from going there. After all, how much do we learn from success and how much from failure? A baby learning to walk falls down quite a lot, but once he finds his balance he uses the skill for a lifetime. We will assuredly use the skills we develop, but we learn the most when are in the fumbling, falling-down stage.

DO NOT TOUCH

Once you think your new painting is fairly complete, spend some time looking at it, reviewing the goals you set. This time should be spent only looking, not making changes. Let your eye come to see the strengths of the painting over a period of time. This might mean that instead of setting it on the easel to review, where you could be tempted to grab a pastel to correct it too soon, you should instead set it somewhere away from the studio. Spend time with the piece, walking past it at different times of the day, in different lighting situations. Live with it a while until you have some sense of the good things you see there, as well as the things you know need changing.

When you see what needs to be changed, think about the solutions you might use. Too often in our haste to rid the painting of the offending portion we snatch a color and cover it up or wipe out that part altogether without taking the time to think. Stop and consider at least two or three possible ways to correct the problem. If color is the difficulty, what additional colors layered over might cure it or what color might replace the existing one? If it is a compositional problem, how might you rearrange the elements? Whatever the trouble, taking the time to think of several ways to treat it will help increase the knowledge and skills you must have as an artist.

When you’ve arrived at a decision about the changes to make, try the first way. If that seems not to correct the issue, try the next solution. Rational, well thought-out decisions are the instruments by which we learn.

FALL OUT OF LOVE

Never become so devoted to any one part of a painting that you’re unwilling to sacrifice it to the betterment of the entire work. These little icons of success can often be the obstacles that hold us back from progressing. No matter how successfully painted, if the sheen of light on the river is too light in value, distracting the eye from the center of interest, you must take it out. No matter how beautifully rendered the lacy edge of the foliage, if the sky shining from behind is too dark, it must be replaced. Too often we esteem the one part that succeeds and forget to reach toward the success of the whole.

Most of us tend to be somewhat enamored of those paintings that make it past the first few revisions. We’ve put considerable time into the painting and may find irresistible what has been achieved. Now we should wait until we have fallen out of love with the piece before continuing to evaluate it. This might be a good time to put the painting away for a long enough time that you forget that first blush of pleasure. When you can look at it more dispassionately, in a manner that’s detached enough to admit the flaws alongside the strong points, bring it out for a final evaluation.

THE CRITIC

Now is the time the painting should be subjected to the opinions or advice of the critic you select. Learning self-criticism does not mean you never ask another person to criticize your work. In fact, having a critic you trust is important. You can learn a lot about how and what to criticize by working with a good critic.

Find someone who can consistently help you grow and has your best interests at heart to help you evaluate your work. Whether this is an artist friend or a professional teacher you pay to critique a small body of work, do not neglect this aspect of learning and evaluation. You have to seek criticism in order to grow.

Do not ask for an opinion about a painting or body of work until you are ready to hear and use the advice. Nothing is gained by asking for guidance you intend to refute. To defeat this, be sure you know what you value in the piece and what parts you want help changing. Instead of approaching the critic with a helpless “I just don’t know what to do” attitude, it might be more helpful if you point out those things that please you and are working, as well as those you feel need improvement.

The opinion of an untrained critic can be valuable as well. If a neighbor steps into your studio, ask what she thinks of some aspect of your piece. Again, this might work best if it’s specific rather than general. Asking a question about the color or composition elicits a less ambiguous reply, but be open to hearing whatever comments come. Children can be particularly candid -- and often helpful in their forthrightness if the artist is willing to be open.

A LIFETIME SKILL

Criticizing your work is a skill that must be developed alongside the painting techniques you need to succeed. Being able to evaluate what works and why, as well as what needs improvement, is an ability you can develop with practice.

Set goals and remain open to possibilities. Be willing to take risks and look for the things you need to learn or improve. Take the time you need to see your strengths and weaknesses, to decide rationally on a course of action and pursue it or try varying solutions. Find a critic you trust and listen to the advice you receive.

As an artist, you have a lifetime of challenges and new growth ahead. Do not neglect the art of self-critique.


How to Criticize Your Own Painting

Before you change anything...

As you look at a new painting consider many possibilities before changing anything. Analyze these and consciously decide on changes before doing anything. Then ask the following three questions:

1. Where are the places of harmony and movement? What has succeeded? Which part is most pleasing to you and why? Are there places that you especially like?

2. Where are the places that jump out? What causes this? Think of two or three ways to correct the problem.

You may stop here and make the needed changes if you feel you have enough ideas and information to go on. If not, try step three, but be sure you know what you like and don’t like before asking anyone else.

3. Show the painting to a critic. This should be someone you trust to tell you the truth, trained or untrained, or can be someone off the street whose opinion you know nothing about. The idea is to get a fresh viewpoint, not to determine the majority opinion. Ask people to help you see problem areas before you make changes, then develop a plan and learn from what you try. This is a way to aid in the development of your own opinion.

Do not stand in front of a painting and “try things.” This rarely results in improvement. Instead, make brief note of the possible changes in each piece and consider what will happen if you try them. Willy-nilly changes sometimes work, but often you can’t sort out why.

Take the time to ask questions about the painting, then move around and try different ways of looking at it before you pick up a pastel.

When you’re ready, make the needed adjustments.


Questions to ASK about the painting

What was my goal in this painting? What is it about the place or the photograph that made me want to paint it?

Was there a feeling or mood I wanted to express here? Did I succeed?

What is my center of interest or focal point?

Have I used detail in the appropriate places to enhance the focal point, or is the painting overly detailed and boring?

Are there a pleasing variety of textures and lines? Do they enhance the focal point or overwhelm it?

Is there a good range of light to dark values? Do they form an interesting abstract pattern?

Where is the area of highest contrast? Where do the darkest dark and the lightest light come closest together? Is this enhancing the area of greatest interest?

Are the four landscape values presented accurately? Is the sky light, the ground medium-light, the mountains medium dark and the trees dark? If not, why not?

What palette of colors have I used? Are the colors in this painting generally bright, muted, dark or light? Is it mostly warm or cool? Would some variation improve it?

Did I begin with a strong underlying abstraction of shapes? Did I retain them throughout the painting? How might I improve this in the future?

Is the shape and size of the paper best suited to this composition? Would this painting be stronger if I changed the format?

What movement occurs in the painting? Is it interesting? Is it organized and complete? How could I vary the shapes to improve the movement?

Are the negative shapes in this piece interesting?

Are there a compositional X that traps the eye or a V that points the eye off the page?

Do I have a visual treat at the apex of any visual path such as a road or stream? Does it move the eye or stop it?

Is the linear perspective correct?

Is the aerial perspective correct -- lighter, bluer, less detail, less contrast, softer edges? Is there a sense of “air” no matter how shallow the depth?

Are there little objects sitting on the windowsill of the painting?

Are there any places where the painting is unresolved and mysterious?

Are there places where color jumps out or there are needlessly interesting details?

Are there any haloes?

Are there any wallpaper patterns?

Is there any object cut in half or less? If so, why?

Are there any unintended repetitive shapes?


Different ways to LOOK at the painting

Squint your eyes to lose detail. Is the underlying design of shapes and values strong?

Use a red filter to look at your painting, your photo or at the world so that you can see values. Remember that any reds will turn white or very light in value.

Stand back far enough that your painting looks no larger than a postage stamp, even if you have trouble seeing that far. Take ten steps closer. What has changed? Take ten steps closer. What has changed? Repeat. Notice how distance changes your perceptions. At what distance is the painting strongest and why?

Trace the movement by closing your eyes for a minute, then tracking where your eye begins and ends in your painting. Try this several times until your eye moves easily around the composition. Name the kind of movement: horizontal, vertical, circular, etc.

Look at the painting using only your peripheral vision. Stare at a point to the side of it.

Turn your painting upside down and sideways. Look for the abstract elements of color and design.

Look at your painting in a mirror or use a reducing glass or binoculars turned backward. Look for the abstract shapes.

Put a mat around the painting or use wide masking tape to make a mat to cover any vivid color on the edge of your painting.

Crop parts of the painting to see if it improves.

Put your painting in direct sunlight. What happens to the colors?

Put your painting under artificial light at night and use a dimmer switch to see how the light levels change it.


Remember...

Have more than one painting to work on at any time. Give your mind room to wander from subject to subject as your mood changes.

Find your strengths and don’t try to do someone else’s work. Emulate techniques. Develop your own style.

Let go of failure and look to the future.

Relax. Have fun. Learn. Grow. Experiment.


Wednesday, September 15, 2010

CHAPTER THIRTY-TWO -- FROM STUDIO TO PLEIN AIR


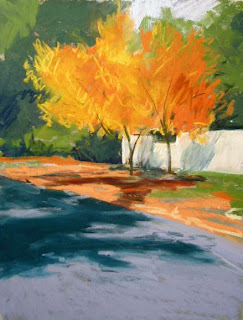
Poblanos Autumn, 12" x 9"
 (With thanks to The Pastel Journal where this was originally published.)

A man stands at his easel painting the breathtaking vista before him. The sky is bright blue, the day calm and warm. His black umbrella punctuates a field of green and yellow grass near shady cottonwood trees. The mountains are a sweep of cobalt and lavender, topped with crisp white clouds. It looks ideal. No wind. No rain. No bugs. No dust. It’s no wonder painters wish to paint outside on such a glorious day.

But the fact is that it can be uncomfortable painting “en plein air”—meaning on location. Dust does blow, bugs do bite, the sky darkens or the wind blows. It takes planning and energy to drag the easel, pastels and umbrella to the car, drive to a location, lug your gear to a spot, set it up and take it down, then drive home again, usually tired and sometimes unsatisfied with the day’s work.

Working in the studio is usually far less challenging than location work. There, you can control the environment and are able to settle down to work. Lighting conditions remain stable and you can take the time to carefully plan and execute a painting, which can be difficult when working outside. There are no burrs clinging to your socks or stray dogs wandering under your easel, no wind or rain to contend with. Studio work is much less physical, and if nothing comes of the day’s work at least you haven’t spent gas money to do it.

So why do so many painters go through all that to paint outside?

It’s simpler to paint a striking locale from a photograph, yet open-air paintings have a depth and range of color impossible to find in any photograph. Photographs taken at the same time and location look accurate but often are unsatisfying. We’ve come to believe that the color in a photograph is somehow more real, when in fact the interpretation of colors that the artist brings to a painting is far more valid. Shadows are frequently too dark or light areas washed out in a photograph. Paintings made on location have an appealing variety of colors, in shadow or sunlight.

Color is made from light. Painting in the natural sunlight reveals the complexity of the colors all around us. As you look into the shadows you can see details, though they are cooler and darker in value, while the light areas are luminous and glowing. Although most painters prefer to work under the shade of an umbrella or in the solid cast shadow of a building or other object, it’s not impossible to stand in the open sunlight and paint. Light and color go hand in hand. Light is the key to color, which is in turn the key to mood in a painting.

Still, plein air painting takes some getting used to. The almost overwhelming amount of subject matter can result in crowded paintings with no focal area. No piece of paper is adequate to the task of painting the whole world -- or even the western horizon alone. It’s necessary to limit the scope of what you paint on location. Rather than trying to do a painting of the road that leads to the house with the shade trees and flower garden, and the mountains beyond that with the clouds building up to a storm, it’s better to select only parts to paint. Choose the road leading to the house one day. Move closer and paint the garden another day. Then take on the mountains and clouds on a day when they are spectacular.

Even within the context of your chosen subject -- say the mountains and clouds -- use some tried-and-true methods to limit what you paint. Frame the world with your hands or use mat corners to block out portions until you can see clearly what will fit on the paper. Select a visual landmark where you can place your viewfinder, putting the corners in the same position repeatedly so that you can renew acquaintance with your selected bit of the world when needed. Some artists like to look through an empty slide mount. Because you have to close one eye to do this, your field of vision flattens, which sometimes makes it easier to see shapes as interlocking puzzle pieces.

Paintings composed using photographs often look different from those painted outdoors. They contain details that are easily ignored when painting on location, such as the grass directly in front of the easel and the branch overhead that protrudes into the picture plane. The camera lens puts the world out at arm’s length, pushing everything away from the viewer, changing the perspective. The point of view of a plein air painting seems grounded, as though you can sense the easel sitting in the dirt, and extraneous details are easily ignored.

Instead of attempting to complete a painting while on location, it might help to begin by making color and composition sketches on site. When you work quickly and freely you are freed from the desire to paint the perfect finished version of the view. Take along your camera to record details of the place but paint to record your personal response to the colors you see and select the viewpoint and details you want to include. The photographs then become an aid to your personal vision rather than commanding the image. In the studio you can use both photos and sketches to make a finished painting.

Once you discover the pleasure of painting on location and see the merits of color and composition done there, in all likelihood you will be willing to pack your gear and drive out to that special spot or spend time searching out a new one. The delight of seeing and the pleasure of recording your surroundings will begin to outweigh any annoyance and distraction you find there. You probably won’t abandon your studio but you will likely discover that location work strengthens what you do in the studio.

One day you may find yourself standing in a green and yellow field under an umbrella, painting cobalt mountains on a perfect day. No wind. No rain. No bugs. No dust. Then you will know why painters go out on location so often.
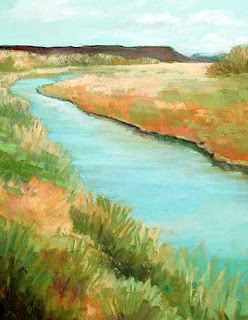
Coronado, 12" x 9"

________________

Materials for Plein Air

lightweight, portable easel
stone sack or empty gallon jug with twine
small palette of pastels (~125 half sticks)
small drawing board, clips, clamps
paper cut to 9x12" or smaller
11x14" newsprint pad with clips OR Clearbags (to transport paintings)
umbrella, clamps
spray bottle (to keep cool)
camera, sketchbook, charcoal, pencils, viewfinder, red filter
wet wipes, paper towels, tape, tools
sunscreen, bug spray, hat OR gloves, scarf, extra socks, jacket
large plastic bags (rain protection, garbage)
cooler, water
folding chair (if watching a demonstration)

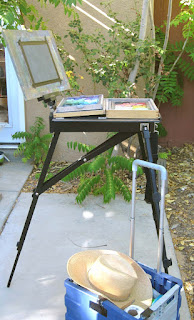
Back yard plein air.

Many people ask me about my easel and palette setup for plein air. I keep it fairly simple. I use the Anderson Swivel Easel, which works perfectly for my height (5'4"), and an old Rembrandt box filled with half-sticks and smaller bits of pastels that I open and set on top of the easel. I carry most of my supplies in a rolling box. (I have carried things in my backpack, too, but I do that less often now.) I try to keep things simple, lightweight and portable, although I pack a lot into my car so I have it when I need it.

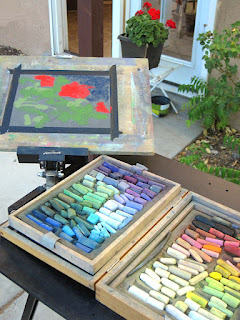
Painting with mast flat.

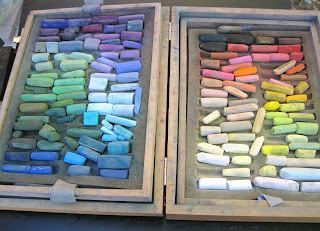
My well used plein air palette.

I enjoy the Anderson Swivel Easel because I can swivel the mast around 360 degrees, allowing me to simply turn another direction without rearranging my easel, or lay it down flat and paint looking over it, standing to one side of the easel. (In windy conditions this can be quite helpful.) It's lightweight, only around nine pounds empty. I often cut paper and tape it in place on my board, one piece on top of the next, so that I can start painting the moment I arrive on location. Then I simply remove that piece, slip in into the newsprint pad or a Clearbag to transport without smearing, and I'm  ready to begin the next one.

I prefer to do color sketches rather than trying to make a "finished" painting. I record the scene as soon as I'm set up and starting to sketch, taking a photo as I see the view from the easel. I record another shot at the end of the hour (if I paint that long--rarely any longer), so that I have two photos and a color sketch to use in the studio if/when I make a finished painting. However, having freed myself from the mental straitjacket of painting to a finish on location, ironically I'm far more inclined to paint what I consider to be finished work. The three paintings shown here, for instance, were painted entirely on location, with no further work in the studio. 


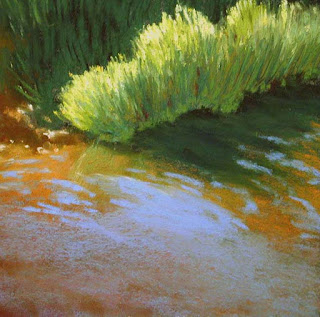
Corrales Acequia, 9" x 9"